A drywall takeoff turns a set of drawings into an orderable list: sheets of each board type, linear feet of studs and track, bags of insulation, boxes of screws and buckets of compound. This is the method our estimators use on every project, from single-family homes to the multi-family package published on our sample page. It includes the formulas, a worked example with real numbers and a free Excel template you can download.
What a Drywall Takeoff Includes
A complete takeoff covers every material the drywall contractor installs, not only the board:
- Gypsum board by type and thickness: regular, Type X, Type C, moisture-resistant, abuse-resistant, shaftliner and cement backer board.
- Framing: metal studs by size and gauge, track, deflection track, headers, backing and blocking.
- Ceilings: drywall grid or hat channel, resilient channel and hanger wire.
- Insulation: thermal batts and sound attenuation batts by R-value and width.
- Finishing: tape, joint compound, corner bead and trim, set by finish level.
- Accessories: screws, and acoustical and fire-rated sealant at the head and base of rated walls.
What You Need Before You Start
Collect these sheets before measuring anything. A wall measured without its wall type or its section is a guess about what it contains and how tall it is.
- Wall type schedule (partition types): tells you what each wall tag means: studs, board layers, insulation and rating.
- Floor plans with the wall tags on every partition.
- Reflected ceiling plans (RCPs) with ceiling heights and ceiling types.
- Building sections and wall sections for heights, especially walls that run to the deck above.
- Finish schedule for finish levels (Level 4 vs Level 5) and moisture-resistant board locations.
- Specifications, usually Section 09 21 16 (gypsum board assemblies) and 09 22 16 (non-structural metal framing).
Step 1: Read the Wall Type Schedule First
Every partition on the floor plan carries a tag such as 1A, WB2 or X4.1. The wall type schedule translates each tag into materials: stud size and gauge, spacing, number of board layers on each side, insulation and the UL assembly that makes it rated. Build a short legend before you measure, one line per wall type, so each measured wall goes straight into the right bucket. Our guide on how to read wall type schedules covers this in detail.
Step 2: Set the Scale and Check It
Calibrate the scale in your takeoff software from a printed dimension, not from the title block alone, because sheets are often re-scaled when they are printed to PDF. Measure one long dimension that is written on the drawing and confirm your measurement matches before you go further.
Step 3: Measure Walls by the Linear Foot, Per Wall Type
Trace every partition and record its length against its wall type and its height. Use a separate color or layer for each wall type so you can see at a glance that every wall has been counted. Measure to the centerline of the wall and keep each floor separate so the quantities match how the job will be built and delivered.
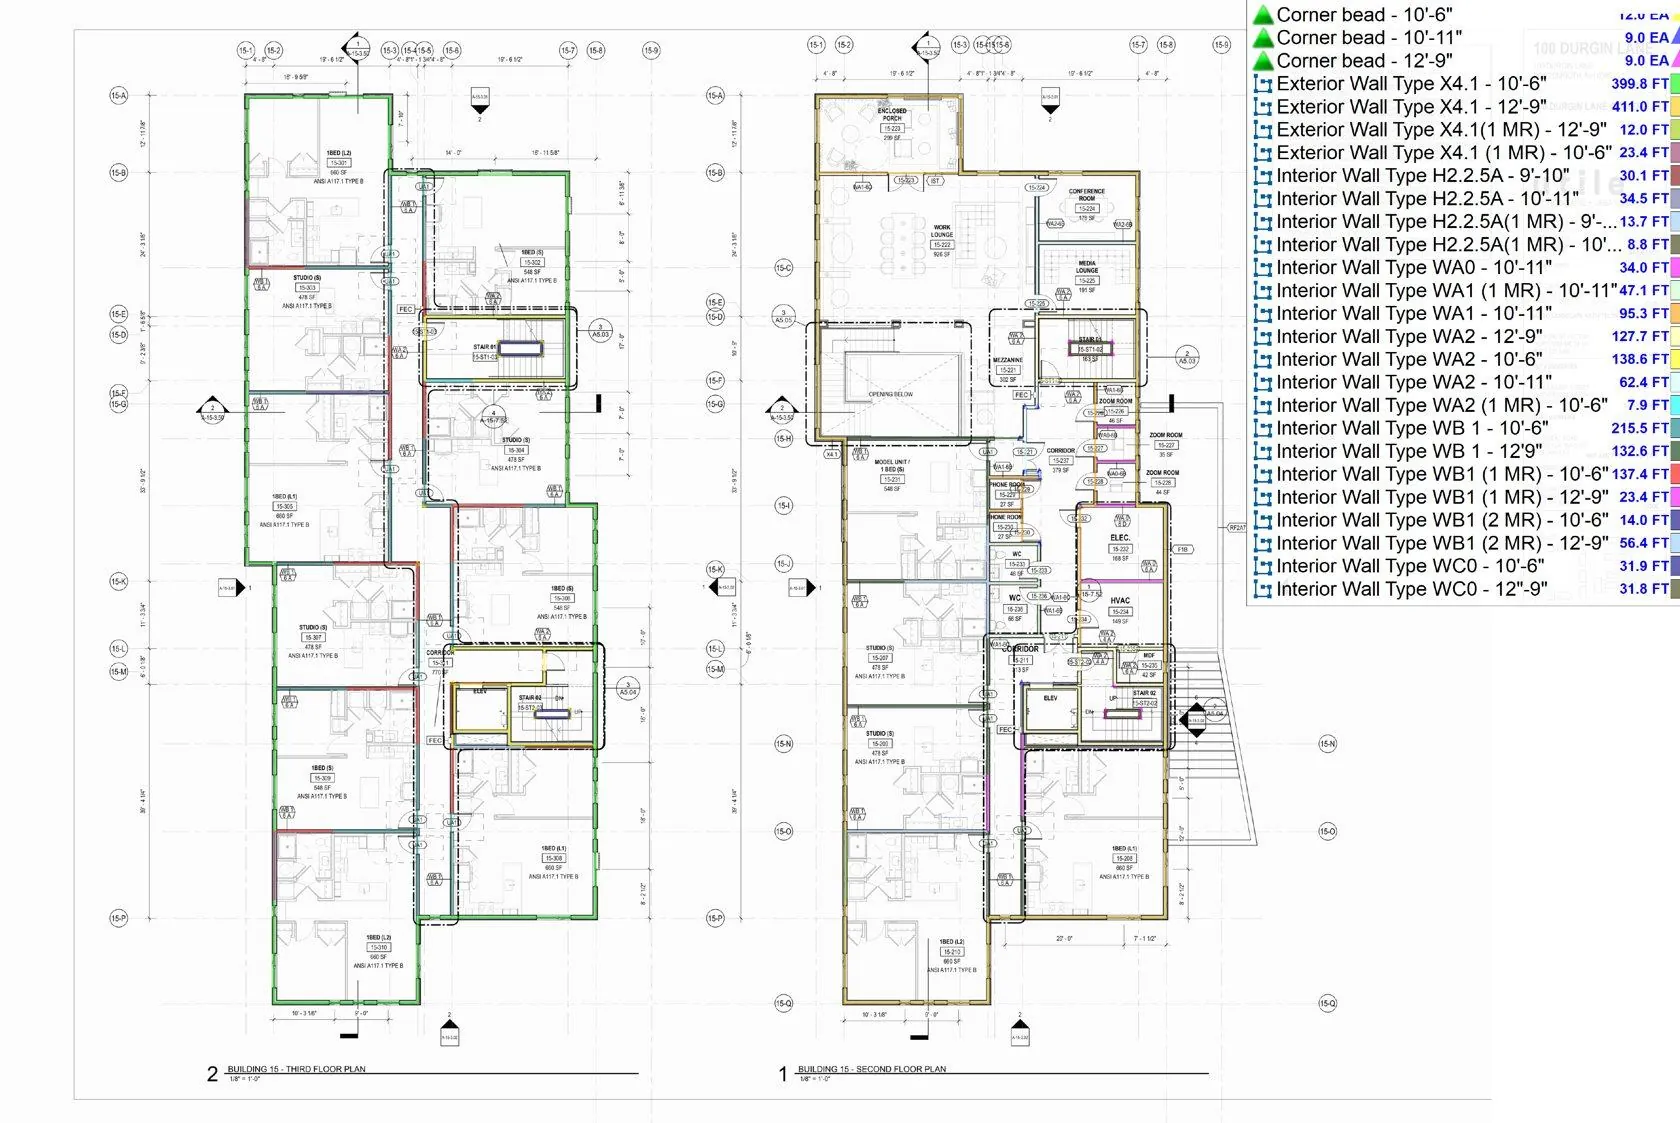
Watch the height. A wall that stops at the ceiling and a wall that runs to the deck above can carry the same tag but very different quantities. Check the wall sections for every wall type that is rated or acoustic, because those usually run full height.
Step 4: Measure Ceilings by the Square Foot, Per Assembly
Work from the reflected ceiling plan. Measure each ceiling area and assign it to its assembly: drywall on grid, drywall on resilient channel, rated floor/ceiling assembly, acoustical tile and so on. Measure soffits and bulkheads separately in linear feet with their height and depth, because they need framing and corner bead that a flat ceiling does not.
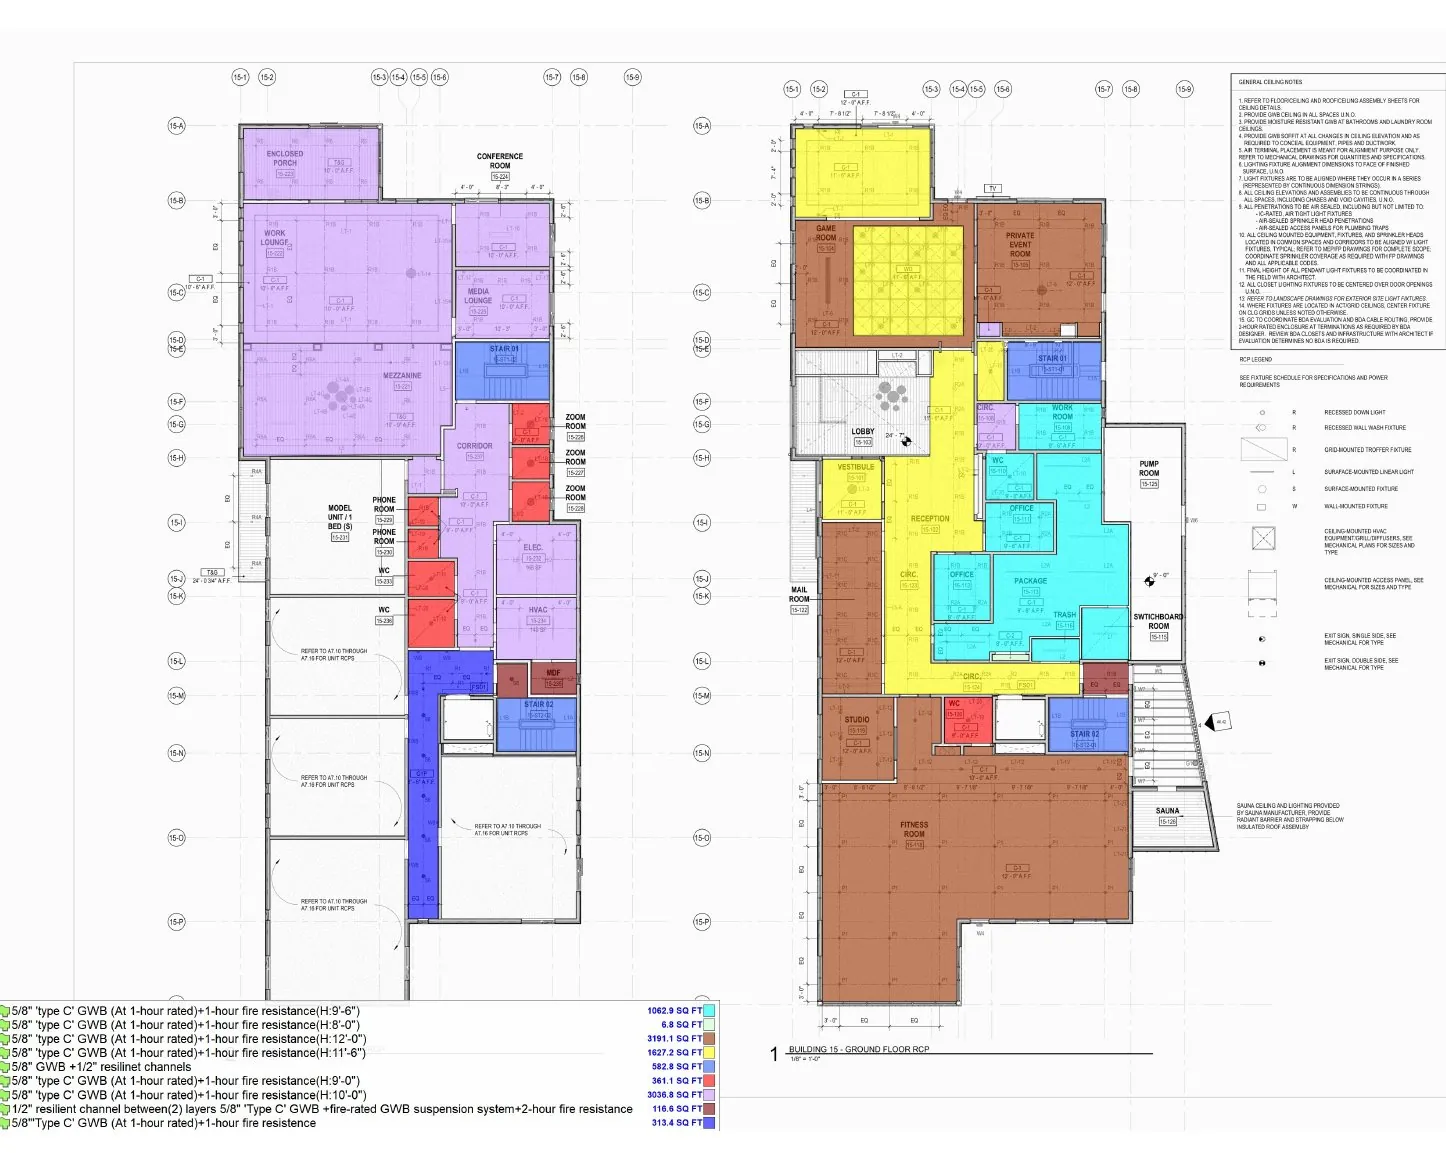
Step 5: Convert Measurements to Materials
Once every wall and ceiling is measured, convert the lengths and areas into materials with these formulas.
| Material | Formula |
|---|---|
| Wall board (SF) | wall LF × height × sides finished × layers per side |
| Ceiling board (SF) | ceiling SF × layers |
| Sheets | board SF × (1 + waste %) ÷ SF per sheet (4x8 = 32, 4x10 = 40, 4x12 = 48) |
| Studs (each) | wall LF ÷ (spacing in inches ÷ 12) + 1 per wall run + studs at openings and corners |
| Track (LF) | 2 × wall LF (top and bottom); use deflection track at the top where the detail calls for it |
| Insulation (SF) | insulated wall LF × height (one side only) |
| Insulation (bags) | insulation SF ÷ SF printed on the bag |
| Resilient or hat channel (LF) | ceiling SF ÷ spacing in feet (12" o.c. = 1 LF per SF; 16" = 0.75; 24" = 0.5) |
On openings: many estimators do not deduct ordinary doors and windows from board quantities, because the cut-outs become scrap that the waste allowance would add back. Large openings such as storefronts and overhead doors are usually deducted. Either is fine if your bid states which method you used.
Step 6: Add Screws, Tape, Compound and Trim
Accessories are calculated from the board total and the measured edges:
- Screws by pounds per 1,000 SF of board.
- Tape and compound by finish level. Level 5 skim coats and fire-taped hidden layers use far more than a standard Level 4 finish, so set these from the finish levels in the documents.
- Corner bead and trim by the linear foot of outside corners, ends and soffit edges.
- Sealant by the linear foot at the top and bottom of every rated or acoustic wall.
Step 7: Apply Waste and Check Your Totals
Add waste per material, not one flat percentage for everything. Board in straight, tall walls wastes less than board in small rooms full of corners. Our waste factor guide lists typical allowances. Then sanity-check the result floor by floor. Typical floors in the same building should produce similar quantities; a floor that comes out very different usually means a missed area, a missed second layer or a wall type measured at the wrong height.
A Worked Example From a Real Project
These numbers come from a real multi-family estimate in Maine. Every figure below is from the delivered material list, so you can see the formulas reconcile:
- Board to sheets. The takeoff measured 891,348 SF of 5/8" Type X. Divided by 48 SF per 4x12 sheet, that is 18,569.75, ordered as 18,570 sheets. Across all 4x12 board on the job, 1,669,927 SF converts to exactly 34,790 sheets.
- Insulation to bags. 118,007 SF of R-11 batts at 177.99 SF per bag is 663 bags. 140,612 SF of R-19 at 87.5 SF per bag is 1,607 bags.
- Screws. The project ordered 9,074 lb of 1-1/4" drywall screws for 1,719,623 SF of board and backer board, about 5.3 lb per 1,000 SF.
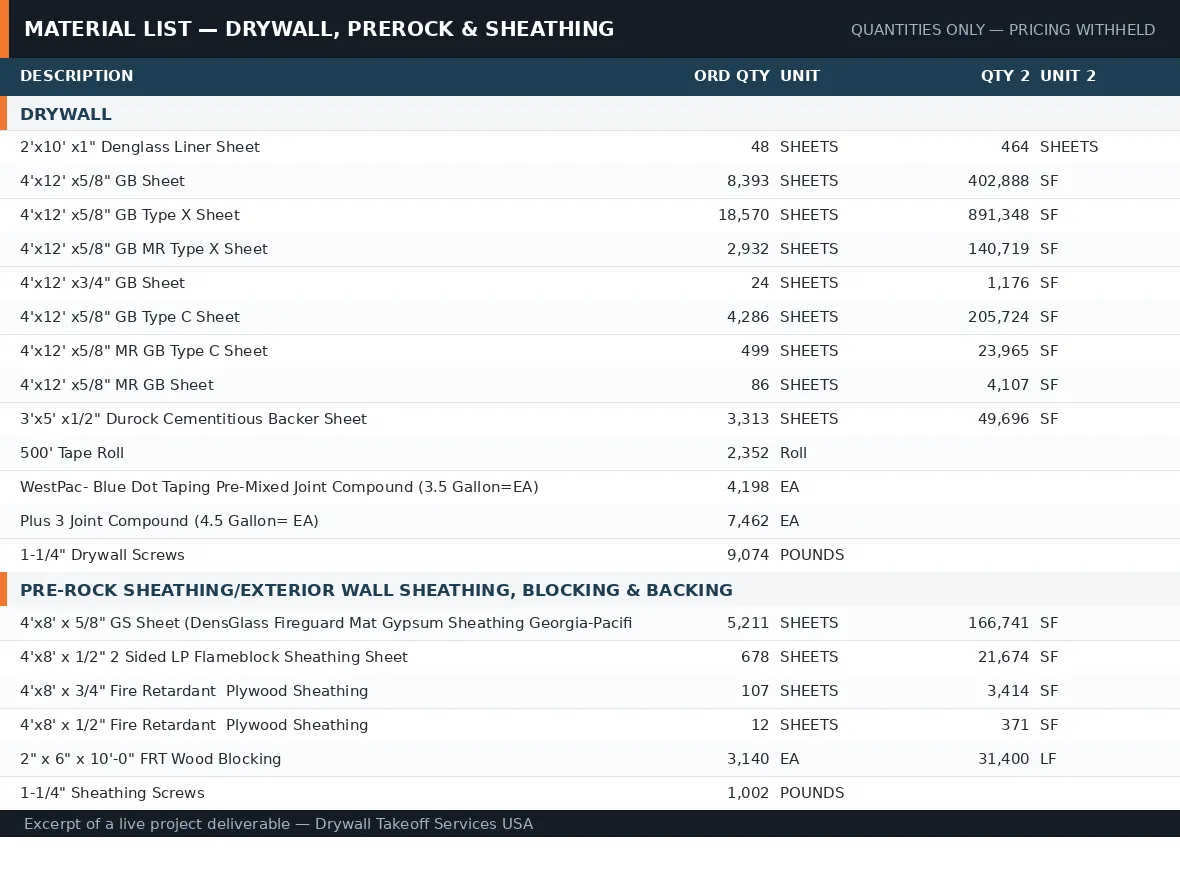
The rated, multi-layer assemblies on this project used much more tape and compound per square foot than single-layer work, because hidden layers get fire-taped. That is why accessory rates should come from the finish requirements of the project in front of you, not from a single rule of thumb.
Free Drywall Takeoff Template (Excel)
The template puts the formulas above into a spreadsheet. Enter wall types with their linear feet and heights, and ceiling assemblies with their square feet. It totals board SF and sheets with waste, studs, track, insulation, resilient channel, screws, tape and compound. Inputs are blue and formulas are black, and the accessory rates are yours to set from your own history.
Download the Drywall Takeoff Template (.xlsx)
Common Drywall Takeoff Mistakes
- Missing the second layer on rated walls, shafts and demising walls, which can double the board on those walls.
- Using ceiling height for full-height walls that run to the deck.
- Forgetting the hidden scopes: resilient channel, sound batts, sealant at the head and base of rated walls and backing for wall-mounted items.
- One waste factor for everything instead of per material.
- Skipping the specifications, where Level 5 areas, abuse-resistant board and moisture-resistant board are often defined.
Our drywall takeoff checklist lists every scope to confirm before a bid goes out.
Want the Takeoff Done for You?
If you'd rather spend the time bidding, our estimators deliver the full takeoff with color-coded markups in 24–48 hours, starting from $150 per project for residential and starting from $300 per project for commercial work. Send your plans for a fixed quote within 2–4 business hours.
How to Do a Drywall Takeoff: FAQs
How do you calculate drywall for a takeoff?
Measure each wall type in linear feet and multiply by the wall height, the number of finished sides and the layers per side. That gives board square feet. Divide by the square feet in one sheet (32 for 4x8, 48 for 4x12) and add waste. Ceilings are measured in square feet straight from the reflected ceiling plan, one assembly at a time.
What is the formula for a drywall takeoff?
Board SF = wall LF x height x sides x layers. Sheets = board SF x (1 + waste) / SF per sheet. Studs = wall LF / (spacing in feet) + 1 per run, plus studs at openings and corners. Track = 2 x wall LF. RC channel LF = ceiling SF / spacing in feet.
Do you deduct doors and windows from a drywall takeoff?
Many estimators do not deduct ordinary door and window openings, because the cut-outs are scrap and the waste would be added back anyway. Large openings such as storefronts and overhead doors are usually deducted. Either method works if you state it in the bid.
How long does a drywall takeoff take?
A single-family house is often a few hours of work for an experienced estimator. A commercial or multi-family set can take several days, because every wall type, ceiling assembly and rated detail has to be measured separately. Our turnaround is 24-48 hours for most residential and TI work and 3-5 business days for full commercial sets.
What software is used for drywall takeoffs?
Most professional estimators measure on screen in PlanSwift, Bluebeam Revu or On-Screen Takeoff. The method on this page works the same in any of them, and the free template can hold the results.
Send Your Plans. Get a Fixed Quote in 2–4 Business Hours.
Takeoffs with color-coded markups in 24-48 hours, starting from $150 per project.
Upload Your Plans